DIY – Wirless Router and NAS: Software Pieces
This is the followup post of DIY – RCN. Here I document about the different software used to make my RCN.
Operating System
![]() There are two open source choices BSD(FreeBSD) or Linux(ubuntu). After few days of analysis I decided to go with Linux – because in my work I use FreeBSD. In either case I did not want to use FreeNAS or OpenFiler or any other ready made distro. Since I am familiar with Ubuntu, I decided to use the Ubuntu server version.
There are two open source choices BSD(FreeBSD) or Linux(ubuntu). After few days of analysis I decided to go with Linux – because in my work I use FreeBSD. In either case I did not want to use FreeNAS or OpenFiler or any other ready made distro. Since I am familiar with Ubuntu, I decided to use the Ubuntu server version.
File System
Wanted to use ZFS on my main storage disk but it is not available on Linux yet, so decided to go with XFS. EXT3/4 on the boot disk because it is natively supported and no extra package needed. The boot media is 8GB flash disk.
Installation
Since there is no optical disk drive, installation should be through network or USB. Since most of the Linux distributions supports that I decided to use USB.
- Download Ubuntu 10.10 server
- Download Universal USB installer
- Create bootable install media using the installer
- Boot the system with boot media
Partitions
Although no data is going to be stored in the boot media, it would be good to have separate partitions to store the config files and home directory. Otherwise re-installation would wipe out all the data.
I chose to create 5 partitions
[shell]
/ – EXT4 – 2GB
/usr – EXT4 – 2GB
/var – EXT4 – 2GB
/home – EXT4 – 1GB
swap – – 1GB
[/shell]
Management
Since this device will run headless only way to communicate with the system is through network interface. Having SSH access is good but still having a web interface for common administration access is better. Few Linux applications are available for that my choice is Webmin.
[shell]
sudo vi /etc/apt/sources.list
wget http://www.webmin.com/jcameron-key.asc
sudo apt-key add jcameron-key.asc
sudo apt-get update
sudo apt-get install webmin
[/shell]
After this the machine can be controlled from local network – https://hostname:10000/
Shutdown
Shutting down the system should be easy. Since the storage is connected to the system it cant be power off directly. The file system data should be syncd first and using command line or web interface is not realistic. So programming the ATX power switch is the only way – acpid does that.
[shell]
sudo apt-get install acpid
[/shell]
Storage
The goal was to create file based storage which is accessible from my home network. The NAS server should be big enough for at least next 2 years(1TB). It should be fast enough to view videos from it without flickering(64MB ondisk buffer). It should have hardware fault tolerance(RAID).
Although few of my desktop boards had RAID option in the BIOS menu, I never used it and never explored it. I thought RAID chipsets in a motherboard is equivalent to RAID controllers/adapters. It was one of the decideding factor I favoured for Gigabyte(GA-D425TUD) motherboard with JMicron RAID chipset over Intel(D525MO) motherboard.
After configuring RAID in the BIOS and starting Linux I realized it is not true raid. Because Linux recognized as fakeraid. In simple terms fakeraid is a firmware based RAID. That is all the work is still to be done in software yielding no performance benefit. Advantage of fakeraid is multiple OS which runs on same box can utiltize the same RAID. Since my setup wont have multiboot option, I dont want the fakeraid so decided to go with pure software RAID 0. Here is the steps to create software raid 0.
- Create software raid using multiple devices(md) interface.
- The above command will take some time (around 6 hours) because it needs to sync the contents of both disks.
While it is doing that the status can be checked by using the following command. - Then create a XFS file system on the md device
- Store the configuration
- Create mount point and add the mount information in the /etc/fstab
[shell]mdadm –create –verbose /dev/md0 –level=1 –raid-devices=2 /dev/sda /dev/sdb[/shell]
[shell]cat /proc/mdstat[/shell]
[shell]mkfs.xfs /dev/md0[/shell]
[shell]mdadm –detail –scan > /etc/mdadm/mdadm.conf[/shell]
[shell]
mkdir /mnt/raid
echo “/dev/md0 /mnt/raid xfs defaults 1 2” >> /etc/fstab
[/shell]
Windows File Sharing
After this /mnt/raid can be made accessible to remote machines through either NFS or through Windows File Sharing. For Windows File Sharing samba service needed to installed. The following command installs samba server.
[shell]sudo apt-get install samba[/shell]
After installing samba server it can be configured using webmin. Use webmin to configure samba “Servers”->”Samba File sharing”. Add the storage mount point here.
Router
The routing functionality is very simple – handle all 3 interfaces with some limitations.
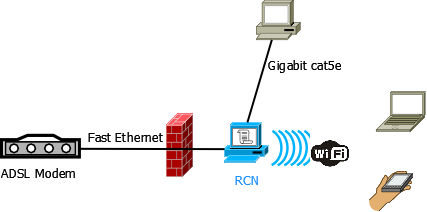
- First interface eth0 is a Gigabit ethernet interface which is directly connected to the a desktop computer.
- Second interface eth1 is a Fast ethernet interface which is directly connected to internet(connected to a ADSL modem).
- Third interface is 802.11n wireless network.
Network and IP
All interfaces are in different networks. All interface should get static IPv4 address while booting up. This router should provide dynamic IP to the other machines.
Modify network interface and dhcp configurations
[codegroup]
[shell tab=”/etc/network/interface”]
# This file describes the network interfaces available on your system
# and how to activate them. For more information, see interfaces(5).
# The loopback network interface
auto lo
iface lo inet loopback
# The primary network interface
auto eth0
iface eth0 inet static
address 192.168.1.2
netmask 255.255.255.0
gateway 192.168.100.2
post-up iptables-restore < /etc/iptables.up.rules
up /etc/init.d/dhcp3-server start
#wireless network
auto wlan0
iface wlan0 inet static
address 192.168.2.1
netmask 255.255.255.0
gateway 192.168.100.2
up /etc/init.d/dhcp3-server start
#wan interface
auto eth1
iface eth1 inet static
address 192.168.100.2
netmask 255.255.255.0
gateway 192.168.100.1
[/shell]
[shell tab='/etc/dhcp3/dhcpd.conf']
subnet 192.168.1.0 netmask 255.255.255.0 {
range 192.168.1.100 192.168.1.200;
option domain-name-servers 208.67.222.222, 208.67.220.220;
option routers 192.168.1.2;
option broadcast-address 192.168.1.255;
default-lease-time 600;
max-lease-time 7200;
}
subnet 192.168.2.0 netmask 255.255.255.0 {
range 192.168.2.100 192.168.2.200;
option domain-name-servers 208.67.222.222, 208.67.220.220;
option routers 192.168.2.1;
option broadcast-address 192.168.2.255;
default-lease-time 600;
max-lease-time 7200;
}
[/shell]
[/codegroup]
Finally enable forwarding in Linux kernel by setting a system tunable.
[shell]echo 1 > /proc/sys/net/ipv4/ip_forward[/shell]
To set it during boot modify /etc/sysctl.conf
NAT – Network Address Translation
NAT is required on eth1 to translate addresses on any outgoing packets and incoming packets. For the iptable rules should be set correctly, the following script does that.
[shell]
INTIF=”eth0″
EXTIF=”eth1″
#set default polices and flush
iptables -P INPUT ACCEPT
iptables -F INPUT
iptables -P OUTPUT ACCEPT
iptables -F OUTPUT
iptables -P FORWARD DROP
iptables -F FORWARD
#setup NAT
iptables -t nat -F
iptables -t nat -A POSTROUTING -o $EXTIF -j MASQUERADE
iptables -A FORWARD -i $EXTIF -o $INTIF -m state –state ESTABLISHED,RELATED -j ACCEPT
iptables -A FORWARD -i $INTIF -o $EXTIF -j ACCEPT
INTIF1=”wlan0″
iptables -A FORWARD -i $EXTIF -o $INTIF1 -m state –state ESTABLISHED,RELATED -j ACCEPT
iptables -A FORWARD -i $INTIF1 -o $EXTIF -j ACCEPT
iptables -A FORWARD -i $INTIF -o $INTIF1 -j ACCEPT
iptables -A FORWARD -i $INTIF1 -o $INTIF -j ACCEPT
#unblock certain services
#webmin
iptables -A INPUT -p tcp -m tcp –dport 10000 -j ACCEPT
[/shell]
Wireless
 Now it is time to setup the wireless interface. Assuming the wireless are drivers are present in the kernel.
The other tool required is hostapd. hostapd implements IEEE 802.11 access point management.
hostapd configuration
[shell]
interface=wlan0
driver=nl80211
ctrl_interface=/var/run/hostapd
ctrl_interface_group=0
ssid=rcnap
hw_mode=g
channel=11
ieee80211n=1
#ht_capab=[HT40-][SHORT-GI-40]
wpa_pairwise=TKIP CCMP
wpa=1
[/shell]